
rider: Marco Jaggi photo: Mesum Verma loctation: Nanjing, China
Text: Marco Jaggi
Marco has been biking for almost 20 years. Growing up in Switzerland he had more than enough great trails to ride and explore. Bringing together his passion for filmmaking and riding, he produced Europe’s biggest mountain bike movie “evermore” in 2006 featuring world class riders like Greg Minaar, Anne-Caroline Chausson, Timo Pritzel, Thomas Frischknecht and many more. “Biking has taken me so many amazing places and given me the chance to share moments of absolute bliss with my best friends or even with some of the best riders in the world. Up to this day, some of the most glorious moments in life are those speeding down a flowing, technical single-trail, wind in your face, nothing going through your head but the trail before you. Pure freedom!”
Today Marco lives and works in Shanghai, enjoying the unknown trails of China.
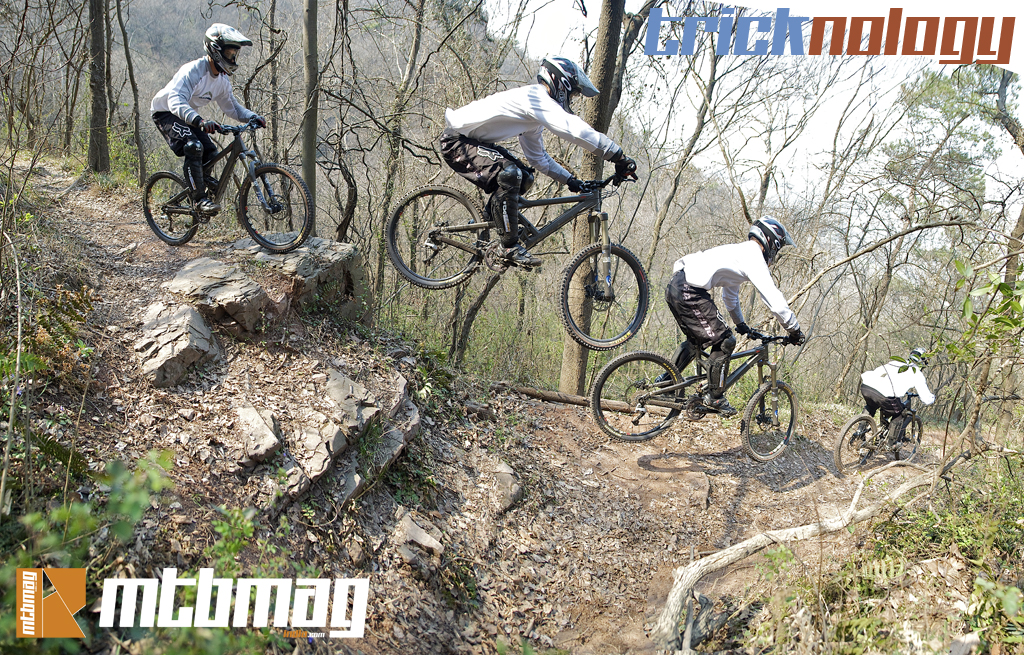
Preparing the drop… Knowing what to expect.
It’s better to evolve step by step and not to take on the big stuff in the beginning. After feeling safe and confident on smaller things, you’re ready to go for the larger pieces of cake.
The bigger the drop, the more you’ll need nerves… The trick is not to get too nervous, especially at the take-off and in the air, because these are the two most critical points. It helps a lot to carefully look at a drop or kicker before riding it. This will give you confidence because you know what you’re up for and can avoid bad surprises. Checking out the run-in, take-off, landing and where to continue your line are key things. If necessary clean out loose rocks and branches or use them as marks (e.g. to mark where to take-off or land). I usually test the run-in a few times without jumping. That will give me the feeling for the right speed and timing.
Even professional riders do these things very carefully. When filming with the top shot riders, I spent a fair amount of time just examining trails and obstacles to figure out radical lines to ride and juicy angles to shoot from.
Run-in… Stabilize your bike and control your speed.
The run-in gives you the necessary speed and stability for the drop. First I try to make sure my bike feels stable when riding towards the drop and I keep my eyes focused on the take-off point. If you don’t feel comfortable or in control of your bike before doing the drop just stop and retry again. A sketchy uncontrolled run-in can mess up your take-off and get you into trouble.
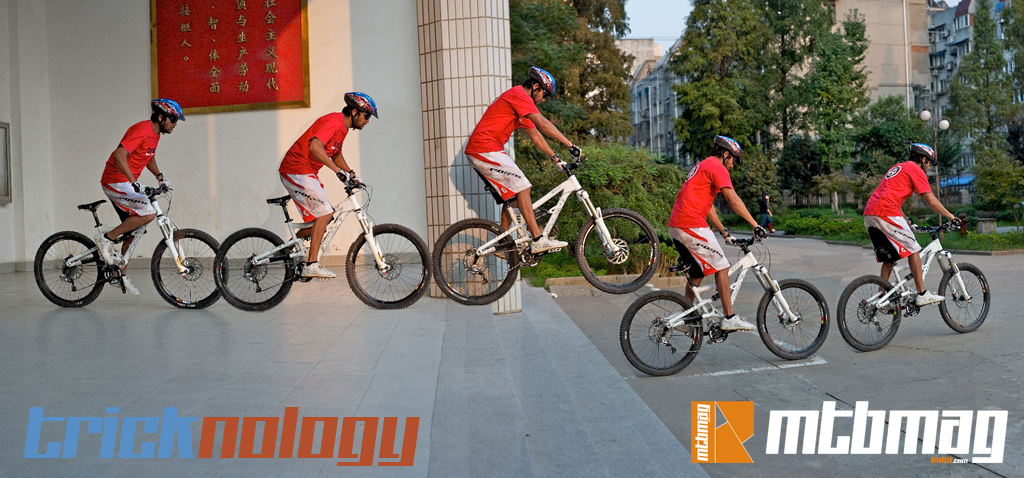
Approaching the take-off… Focus the take-off, than the landing.
When riding towards the drop I stop pedaling 2-3m before, get out of the saddle and level my pedals horizontally. Then I focus my eyes on the take-off point for the last time and before doing the drop my eyes already focus on the landing. Your eyes guide your mind and your body. Never focus on where you don’t want to go.
Take-off… Focus on the landing and push your bike off the ground slightly.
Before the front wheel runs off the ledge I pull it slightly up with my arms and half a second later push off my back wheel from the ground, just like a bunny hop. With a drop like this you don’t have to make a huge bunny hop. That would make you less stable in the air, cost you energy and in case of a race even give you unnecessary long air-time. Just a subtle push-off will be enough. Of course if you like to style it give it a stronger push-off. That way you have more time in the air to fly further and maybe do a trick.
In the air… Stay calm, direct your bike with your arms, knees and feet and focus on the landing.
The trail turns left just after the drop. If you drop straight you’ll fly into the bushes and crash. To turn my bike I use arms and legs. My feet and knees put slight pressure on pedals and frame/saddle in the direction I want to go. For this drop this means slightly to the left. My arms also push the handlebar slightly to the left. You can see that the wheel is even turned a little to the left.
My arms are stretched, my butt is behind the saddle, eyes are focused on the landing. Don’t lean forward or stay in the saddle when in the air. That will make your front wheel sink and you’ll land on your front wheel or crash. Stay cool and make all movements controlled and slowly. You have enough time and you’ll be fine.
Landing… Stretch arms and knees, level your wheels, focus on where to go after landing, take the impact.
Shortly before you land, the bike should be in line with the trail and your front wheel straight. During the air time I have stretched my arms and legs and moved my butt forward, just above the saddle. That way I make sure both wheels land at the same time and my body can absorb the impact of the landing. With the help of arms and legs you can level your bike and make sure not one of the wheels touches the ground before the other. That way you can absorb the impact with all your bikes’ suspension and your body and have a controlled, smooth landing.
Half a second before the landing, your eyes already focus on where to go after. A drop doesn’t end with the landing, but only with the first few meters after the impact. If you focus on the landing too long, it can happen that your bike falls forward, you land with the front wheel first, get surprised by what happens next and… bang!
Where to go next… Already know how to ride the next few meters.
Mostly I forget the drop the second I land and only see the trail ahead. Make sure you know what’s coming next and know how to ride it. A drop or a jump will give you extra acceleration, so make sure to control the speed after landing.
The more you take drops the easier and more fun it gets. If you than ride the whole trail, you often don’t really notice it when riding the drop, because it gets to be just as normal as riding a bumpy rock section or a strong turn. That’s when you start getting the flow… Enjoy it!!
Today Marco lives and works in Shanghai, enjoying the unknown trails of China.
Preparing the drop… Knowing what to expect.
It’s better to evolve step by step and not to take on the big stuff in the beginning. After feeling safe and confident on smaller things, you’re ready to go for the larger pieces of cake.
The bigger the drop, the more you’ll need nerves… The trick is not to get too nervous, especially at the take-off and in the air, because these are the two most critical points. It helps a lot to carefully look at a drop or kicker before riding it. This will give you confidence because you know what you’re up for and can avoid bad surprises. Checking out the run-in, take-off, landing and where to continue your line are key things. If necessary clean out loose rocks and branches or use them as marks (e.g. to mark where to take-off or land). I usually test the run-in a few times without jumping. That will give me the feeling for the right speed and timing.
Even professional riders do these things very carefully. When filming with the top shot riders, I spent a fair amount of time just examining trails and obstacles to figure out radical lines to ride and juicy angles to shoot from.
Run-in… Stabilize your bike and control your speed.
The run-in gives you the necessary speed and stability for the drop. First I try to make sure my bike feels stable when riding towards the drop and I keep my eyes focused on the take-off point. If you don’t feel comfortable or in control of your bike before doing the drop just stop and retry again. A sketchy uncontrolled run-in can mess up your take-off and get you into trouble.
Approaching the take-off… Focus the take-off, than the landing.
When riding towards the drop I stop pedaling 2-3m before, get out of the saddle and level my pedals horizontally. Then I focus my eyes on the take-off point for the last time and before doing the drop my eyes already focus on the landing. Your eyes guide your mind and your body. Never focus on where you don’t want to go.
Take-off… Focus on the landing and push your bike off the ground slightly.
Before the front wheel runs off the ledge I pull it slightly up with my arms and half a second later push off my back wheel from the ground, just like a bunny hop. With a drop like this you don’t have to make a huge bunny hop. That would make you less stable in the air, cost you energy and in case of a race even give you unnecessary long air-time. Just a subtle push-off will be enough. Of course if you like to style it give it a stronger push-off. That way you have more time in the air to fly further and maybe do a trick.
In the air… Stay calm, direct your bike with your arms, knees and feet and focus on the landing.
The trail turns left just after the drop. If you drop straight you’ll fly into the bushes and crash. To turn my bike I use arms and legs. My feet and knees put slight pressure on pedals and frame/saddle in the direction I want to go. For this drop this means slightly to the left. My arms also push the handlebar slightly to the left. You can see that the wheel is even turned a little to the left.
My arms are stretched, my butt is behind the saddle, eyes are focused on the landing. Don’t lean forward or stay in the saddle when in the air. That will make your front wheel sink and you’ll land on your front wheel or crash. Stay cool and make all movements controlled and slowly. You have enough time and you’ll be fine.
Landing… Stretch arms and knees, level your wheels, focus on where to go after landing, take the impact.
Shortly before you land, the bike should be in line with the trail and your front wheel straight. During the air time I have stretched my arms and legs and moved my butt forward, just above the saddle. That way I make sure both wheels land at the same time and my body can absorb the impact of the landing. With the help of arms and legs you can level your bike and make sure not one of the wheels touches the ground before the other. That way you can absorb the impact with all your bikes’ suspension and your body and have a controlled, smooth landing.
Half a second before the landing, your eyes already focus on where to go after. A drop doesn’t end with the landing, but only with the first few meters after the impact. If you focus on the landing too long, it can happen that your bike falls forward, you land with the front wheel first, get surprised by what happens next and… bang!
Where to go next… Already know how to ride the next few meters.
Mostly I forget the drop the second I land and only see the trail ahead. Make sure you know what’s coming next and know how to ride it. A drop or a jump will give you extra acceleration, so make sure to control the speed after landing.
The more you take drops the easier and more fun it gets. If you than ride the whole trail, you often don’t really notice it when riding the drop, because it gets to be just as normal as riding a bumpy rock section or a strong turn. That’s when you start getting the flow… Enjoy it!!
rider: Mesum Verma photo: Matt MacDonald location: Nanjing, China